Discussion/Introduction
In first grade our students were briefly introduced to fractions—or, more specifically, halves and quarters– as equal divisions done on rectangles and circles. They identified halves and quarters and divided their own samples into two or four equal parts. The emphasis was on neat, symmetrical divisions that made it easy to check equivalence.
In second grade, though, we get to work with the concept of strange looking equivalences— portions which are equal but which are different shapes. This concept will probably be counterintuitive to many of your students, but it is an important concept nonetheless: a crucial part of their understanding of space, area, and sameness.
This lesson plan gives a brief review of halves and quarters, introduces the new kid on the block—thirds—and goes on to discuss strange looking equivalences and what it means for portions or fractions to be the same.
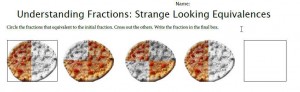
2nd Grade Fractions: Strange Looking Equivalences
Objective
That students would gain familiarity in partitioning circles and rectangles in two, three, and four equal shares, and would understand that equal shares of identical wholes need not have the same shape. (Common Core 2.G3)
Supplies
- One orange
- Construction paper, pre-cut into a quantity of identical rectangles and circles: 3 circles and 5 rectangles, preferably in an assortment of different colors
- Markers
- Scissors
- Scotch Tape
- Beads or other small math manipulatives (12 per student)
Methodology/Procedure
Start class by reviewing fractions, as learned in first grade. Tell your students that you like eating orange every morning, but you only have one orange for today and tomorrow; ask them how much orange you should eat today (half—one of two equal parts). Ask them how you should divide it in half (across the middle), and ask them divide their first circle by drawing a line. Then ask them how much orange you can eat today if you need to make it last for four days. (one fourth – one of four equal parts). Ask them to draw this on their second construction paper circle cutout.
Take the orange out of your desk and tell them that actually, you’ll be able to buy a new orange to eat on the fourth morning. It’s just three days that this orange has to last. Ask how much orange you can eat today.
Divide the orange into three equal portions, and tell the class that they are called thirds. Tell them that when you are making thirds out of a circle there’s no middle line to divide on. Show them, or draw on the backboard, a picture of an orange cross section cut into thirds; demonstrate how you can start by making a line through the middle, to the center point, and then continuing it as a (wide mouth) Y.
Ask your students to draw lines and divide their last construction paper circles into thirds. Have them cut out the segments and lay them over each other to check their own work.
Now tell them to take out their first rectangle, and tell them you’d like this to be divided into thirds. Ask them how they would go about it.
After they have had plenty of time to experiment call up any students who have been especially successful to show their techniques. If they are all still fumbling, show them your rectangle, creased to show thirds. Give them a chance to imitate this with their own paper, and have the first successful student show them how folding the two sides over the middle segment and creasing the fold will give three equal sections— three thirds.
Ask which is larger, a half or a third. And which is smaller, a fourth or a third.
Give each student a pile of twelve beads, tiles, or other math manipulatives, and ask them to divide it into thirds. Let them try to figure this out by themselves before you give them any input. You can continue this exercise to halves and quarters.
—
When your students feel comfortable making divisions in halves, thirds, and quarters, it’s time to go on to strange looking equivalences. If your students had forgotten some of their first grade work, you may want to simply spend the rest of the class period playing with fractions and save this second half of the lesson till your next class. If your students had no difficulties with your preliminary exercises, though, you can go straight on.
Ask the students to divide their second rectangle in halves. Choose two students who have halves that are proportioned differently, and have them show their halves to the class. Ask which is larger.
If there is the slightest doubt in anyone’s mind, point out how, though one is wider, the other is taller. Demonstrate equivalence by cutting and taping the rectangles till they become the same size and shape. Only after you have demonstrated it tell them that half of an object is always the same size as any other half of the same object, no matter what shape it takes. You don’t want them to accept this as a rule for how halves should behave, but simply as a demonstrated fact.
Provide each student with three more identical rectangles, pre-cut out of three different colors of construction paper. Ask the students to draw lines to partition each rectangle in fourths, and tell them you’d like the partitions to be different in each rectangle.
Give the students the attached worksheet and ask them to mark the areas that are equivalent.

Common Core Standards
In 2.G.3, 2nd grade geometry item 3, the Common Core State Standards for Mathematics reads:
2.G.3 Partition circles and rectangles into two, three, or four equal shares, describe the shares using the words halves, thirds, half of, a third of, etc., and describe the whole as two halves, three thirds, four fourths. Recognize that equal shares of identical wholes need not have the same shape.
Web Resources/Further Exploration
You may also want to point your students to some of our other fractions resources and links: