Methodology/Procedure
Start on a positive note: today, we get to play a fun new game! Remember, if you have fun with this, your students will too, and there’s no better way to wire the brain for optimal learning than by making learning fun.
Hand out “My name is” fraction cards from your first stack to everyone in the class. Duplicates are not a problem. Have them insert the cards in the transparent pouches and hang them from their neck.. Explain that the fraction on this card is their name for the rest of the class; and that it will be especially important during a new game that is going to be played.
Use your cellphone or MP3 player to turn on some music, and tell the students to mill around or ‘dance’ while the music is on. As soon as the music is off, they need to line up in order of their fractions. If they’re super-fast, there might be a prize.
Play the music, turn it off, and give the students a small amount of time to make sense of their fractions and try to order themselves. Equivalent fractions stand share one place in the line (standing side by side) . You do not need to wait for them to be done before calling a halt.
Observe that it was pretty difficult, and ask why. If no-one brings it up, you can observe that though we’ve learned to order fractions with similar denominators or numerators—fractions where the division size or number of portions was equal– we never learned anything about how to order fractions where both the top and the bottom were different. These fraction names could just as well be in different languages; they simply don’t want to be compared!
If the fraction names are in different languages and so can’t be compared, what is one way we could compare them?
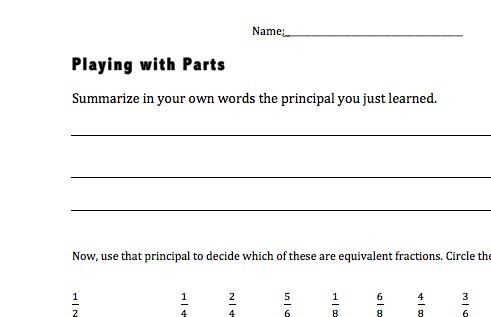
Allow your students discussion time to consider this problem. If they do not arrive at the solution, give it to them: Even if fractions can’t be easily compared in their current state, you can translate them into similar languages so they are comparable! Remind them that one quantity can be described by more than one fraction; and that these different fractions that refer to the same portion are called equivalent fractions. Ask them how they might find other versions of their fraction names.
[Note: if your students came up with the alternative method of ordering dissimilar fractions—comparing to a benchmark—validate their thinking, then go on to discuss creating common denominators and numerators as an alternative way. ]
Summarize their responses on the board, and review any bit that needs reviewing. Then invite them to the table at the front of the room, where you’ve created a big messy draw pile of all the remaining fractions. Give them some time to look through these cards and find their own equivalent fractions. Offer unobtrusive help to anyone who needs it.
When they’ve all got their cards, tell them you’re to play the game again, and ask them whether it will be easier this time. Lead the discussion round to the fact that equivalent fractions, being representations of the same quantity, stand in the same place on the number line. Demonstrate how students can order themselves easily by comparing the fractions, finding pairs with the same numerator or the same denominator, and choosing an order based on that.
Give everyone a chance to compare cards and order themselves, then applaud them on their work and return everyone to their seats. If they’ve made reasonable time, offer them a token prize.
Write your findings on the board: we can compare dissimilar fractions by renaming them as equivalent fractions with common denominators or numerators.
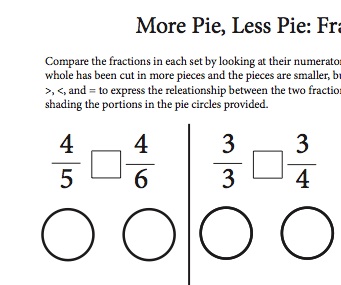
Now write 1/3 and ¾ on the board, and ask them if they can tell you quickly which is larger. Talk them through using ½ as a benchmark fraction—1/3 is smaller than ½ because 3 is larger than 2, and ¾ is larger than 2/4=1/2 because 3 is larger than 2. So since 1/3 is smaller than ½ and ¾ is larger, 1/3 is smaller than ¾. Ask which symbol you should put between the two fractions, and if necessary, offer a short review of >, =, and <.
Now collect all the flashcards—the pile of originals and the pile of new names—distribute original fractions again, and give the students another chance to collect their new names from the draw pile. Ordering should be faster this time. Be available to help anyone who is struggling.
Ask your students to take the Quick Quiz out and time themselves to see how fast they are able to order the fractions on that page.
Hand out “My name is” fraction cards from your first stack to everyone in the class. Duplicates are not a problem. Have them hang it from their necks in the name card holder pockets. Explain that the fraction on this card is their name for the rest of the class, and especially, for a new game that is going to be played
Use your cellphone or mp3 player to turn on some music, and tell the students to mill around or ‘dance’ while the music is on. As soon as the music is off, they need to line up in order of their fractions. If they’re super-fast, there might be a prize.
Play the music, turn it off, and give the students a small amount of time to make sense of their fractions and try to order themselves. You do not need to wait for them to be done before calling a halt.
Observe that it was pretty difficult, and ask why. If no-one brings it up, you can observe that though we’ve learned to order fractions with similar denominators or numerators—tops or bottoms that are the same—we never learned anything about how to order fractions where both the top and the bottom were different. These fractions speak different languages, almost, and don’t want to be compared!
If the fraction names are in different languages and so can’t be compared, what is one way we could compare them?
Translate them into similar languages so they are comparable! Remind them that one quantity can be described by more than one fraction; and that these different fractions that refer to the same portion are called equivalent fractions. Ask them how they might find other versions of their fraction names.
Summarize their responses on the board, and review any bit that needs reviewing. Then invite them to the table at the front of the room, where you’ve created a big messy draw pile of all the remaining fractions. Give them some time to look through these cards and find their own equivalent fractions. Offer unobtrusive help to anyone who needs it.
When they’ve all got their cards, tell them you’re to play the game again, and ask them whether it will be easier this time. Lead the discussion round to the fact that equivalent fractions, being the same number, stand in the same place on the number line. Demonstrate how students can order themselves easily by comparing the fractions, finding pairs with the same numerator or the same denominator, and choosing an order based on that.
Give everyone a chance to compare cards and order themselves, then applaud them on their work and return everyone to their seats. If they’ve made reasonable time, offer them a token prize.
Write your findings on the board: we can compare dissimilar fractions by renaming them as equivalent fractions with common denominators or numerators.
Now write 1/3 and ¾ on the board, and ask them if they can tell you quickly which is larger. Talk them through using ½ as a benchmark fraction—1/3 is smaller than ½ because 3 is larger than 2, and ¾ is larger than 2/4=1/2 because 3 is larger than 2. So since 1/3 is smaller than ½ and ¾ is larger, 1/3 is smaller than ¾. Ask which symbol you should put between the two fractions, and if necessary, offer a short review of >, =, and <.
Now collect all the flashcards—the pile of originals and the pile of new names—distribute original fractions again, and give the students another chance to collect their new names from the draw pile. Ordering should be faster this time. Be available to help anyone who is struggling.
Ask your students to take the Quick Quiz out and time themselves to see how fast they are able to order the fractions on that page.